Dhall Usage Guide
Dhall overview
Introduction
Dhall is a programming language that is designed to be used for the specification of configuration data (i.e. a collection of parameters that is consumed by a library or application that can be used to determine its behavior) in place of file formats such as JSON, YAML, CSV, and so on. File formats such as these have a number of shortcomings for certain tasks: in particular they have limited or no facilities for DRY programming and to ensure that the data is in the correct form needed for the intended library or application. Dhall aims to solve these problems in a programming language that is safe to run on your system with untrusted data (in contrast to general-purpose languages). Perhaps the best summary of Dhall is given by one of its taglines:
Dhall is a programmable configuration language that you can think of as: JSON + functions + types + imports.
The Dhall ecosystem
There are a number of Dhall applications including (a complete list can be found in the Dhall releases GitHub page):
-
A Dhall compiler
-
A Dhall-to-JSON compiler
-
A Dhall-to-YAML compiler
-
A Dhall-to-CSV compiler
There are also a number of general-purpose programming languages that have libraries that implement the Dhall language including Haskell and Rust (see a complete list in the Contributing to Dhall GitHub document). This permits a direct conversion between the host language objects and their corresponding Dhall representations.
Additionally, there are many available Dhall packages that target a specific form of a given output type. For example, the dhall-gitlab-ci package provides types and utilities that can be used to produce YAML that conforms to the GitLab CI configuration schema. Other popular examples include the dhall-kubernetes and the dhall-aws-cloudformation packages.
We use Dhall in a number of important places in our codebase including the definition of codelists in the codelist repository and the definition of events in the event-data-model repository.
Dhall application installation extended discussion
Below are instructions for installing Dhall applications. There are several approaches available which each have their own advantages and disadvantages. If no particular option stands out to you, then installation via compiled binary files is a good default.
-
Dhall application installation via a package manager. This is the easiest option, but the availability of packages may be limited or nonexistent depending on your platform.
-
Dhall application installation via compiled binary files. Using one of the available compiled binary files is quite easy and provides all available versions, but does require a few manual steps.
-
Dhall application installation via Cabal. This option requires the least amount of steps if you know the package component target name but may otherwise take some searching around to find the target name, and also requires you to compile the application locally.
Dhall application installation via a package manager
At this time of writing (July 2022), Homebrew hosts most of the core Dhall applications, while the Chocolatey, Debian, Ubuntu and Fedora repositories host a severely limited or nonexistent set of Dhall applications.
-
Homebrew users can use
brew search dhallto see what is available, andbrew install formulato install the desired package (replaceformulawithdhall,dhall-json, etc.).
Dhall application installation via compiled binary files
You can install a Dhall application by using one of the available compiled binary files. The steps to install a given application are roughly as follows:
-
Navigate to the Dhall releases page and download the desired application and version number for the appropriate target platform.
-
Decompress and extract the files contained in the downloaded file.
-
Move the extracted files into a directory that is on your shell’s executable search path. For example, a common location to place such files on Unix-like systems is the
/usr/local/bindirectory.
Operating system-specific Dhall installation instructions can be found for the particular case of installing the dhall-to-json and dhall-to-yaml applications in the links provided below. Other applications can be installed in much the same way.
Dhall application installation via Cabal
The Dhall suite of applications are compiled from Haskell packages that are available on Hackage
so you can use cabal install to install the applications.
So for example you can use cabal install dhall-to-json to install dhall-to-json, and so on.
If you want to install a particular version (rather than the latest),
you can append the desired version number to the target name as in e.g.
cabal install dhall-to-json-1.7.10.
The tricky part of this approach is figuring out the target name and available version numbers.
One way to find the candidate package names is to look in the
dhall-lang GitHub namespace.
You can then navigate to a given package’s website on Hackage and click on the Package description link to see the Cabal package description file which lists all of the package components.
Furthmore, the Hackage webpage for the package will list all of the package versions that are available for you to specify in the
cabal install target command.
Dhall compilation
The dhall application can be used to evaluate Dhall expressions that can be provided either as a file or through standard input.
Evaluating a given expression roughly amounts to resolving any imports in the expression
(i.e. replacing any embedded URLs, file paths, and environment variables with the expressions that they refer to),
and evaluating all possible sub expressions.
Applications like dhall-to-json and dhall-to-yaml perform the work of evaluating a Dhall expression,
plus the additional step of compiling that expression to its corresponding JSON or YAML representation.
Note that only a subset of Dhall expressions can be transformed into JSON or YAML since e.g. functions and types can’t be represented in those file formats.
Consider the following example demonstrating various methods of compiling Dhall data from the command line.
The Dhall expression used for the following examples is defined between the single quotes in 1
(note that the single quotes are part of the shell syntax).
The Dhall expression binds the variable dir to a string,
and then creates a record value with keys f1 and f2 with corresponding values "src/Lib.hs" and "src/Utils.hs" that are each created by concatenating dir with another string.
-
In 1 we bind the
exprvariable to a string representing the Dhall expression, and then in 2 we write the string from 1 into a file. -
Then in 3, 4, and 5 we see various ways to compile the expression. Recall that
<<<in many shells has the effect of providing the right-hand side term to the command’s standard input. -
In 6 we read from a file and then perform an operation on the result, which in this case is to select the value of the
f1element in the record type. -
In 7 and 8 we compile the Dhall expression into a JSON and YAML representation, respectively.
# Store a Dhall expression both as a string and in a file
expr='let dir = "src/" in { f1 = dir ++ "Lib.hs", f2 = dir ++ "Utils.hs" }' (1)
echo "$expr" > expr.dhall (2)

# Provide the input via standard input
dhall <<< "$expr" (3)
##> { f1 = "src/Lib.hs", f2 = "src/Utils.hs" }

# Provide the input from a file
dhall --file expr.dhall (4)
##> { f1 = "src/Lib.hs", f2 = "src/Utils.hs" }

# An alternative way to provide the input from a file (technically, you are
# creating a new Dhall expression that uses the Dhall import facilities to
# insert the contents of the file). This is not useful by itself since we can do
# the same thing with the `--file` argument, but we'll see a better use of this
# technique in the next example
dhall <<< './expr.dhall' (5)
##> { f1 = "src/Lib.hs", f2 = "src/Utils.hs" }

# Sometimes it is useful to do something with a Dhall expression that is defined
# in a file, such as e.g. extracting something from it. The following example
# imports the expression defined in `expr.dhall` and extracts the value of the
# `f1` element of the record type by using the `.f1` syntax (the open and close
# parentheses around the import statement are needed to differentiate the import
# from the record field access)
dhall <<< '(./expr.dhall).f1' (6)
##> "src/Lib.hs"

# Convert the input to JSON
dhall-to-json <<< "$expr" (7)
##> {
##>   "f1": "src/Lib.hs",
##>   "f2": "src/Utils.hs"
##> }

# Convert the input to YAML
dhall-to-yaml <<< "$expr" (8)
##> f1: src/Lib.hs
##> f2: src/Utils.hsR Usage Guide
Best Practices
Code Coverage
R’s code coverage tool is the
covr package.
This package is available in the nsBuild registry’s r:<VERS> docker images.
The "top-level" coverage can be reported in a CI pipeline’s info as described here. This requires that "Test coverage parsing" in the repository’s Settings > CI/CD is set to:
Coverage:.+\d+.\d+\%Haskell Tool Chain Usage Guide
The purpose of this section is to provide guidance on Haskell toolchain usage. This includes best practices in the language itself and guidance on package development.
ghcup Usage
This section outlines common usages of ghcup.
The use of --help after a ghcup command will open a help menu for that command.
|
Many ghcup commands take several minutes. |
ghcup install
To install an application you can use the following command:
ghcup install application_name application_versionSupplying the version number is optional.
If the version number is not supplied
then ghcup will install its recommended version.
To see ghcup’s recommended version,
you can use ghcup list as described in ghcup list section.
ghcup list
The results of ghcup list provide the following information:
-
The applications (and their associated version) that are available for download using
ghcup. -
The applications that have already been downloaded through
ghcup. -
The current recommended version of an application according to
ghcup. -
The version of a given application that is active (see the ghcup set section for details on the definition of "active" and how to change the active version).
Additional information is provided in the first column of the output.
If a given row has an "✗" in the first column, then the corresponding
version of the application has NOT been downloaded by ghcup.
If a given row has a "✔" in the first column, then it means that it
has been downloaded by ghcup. Finally, if a given row has a "✔✔"
in the first column then it means that it has both been downloaded
by ghcup and is the active version.
ghcup set
The ghcup set command sets the "active version" of a given application.
This is the version used for shell commands such as ghc
without supplying the version number parameter (e.g. ghc 9.2.1).
To change the current active version for a particular application, use the following command:
ghcup set application_name application_versionIf the version is not supplied, then ghcup will default to the current active version.
ghcup stores files in the $HOME/.ghcup/bin directory.
These files contain a symbolic link to the active version of the application.
For example, suppose that the active version of ghc is ghc 8.10.7.
Then running the command ghc in your shell would run ghc 8.10.7.
GHC Usage
This section outlines common usages of GHC.
Using --help after a ghc command will open a help menu for that command.
Cabal Usage
This section outlines common usages of Cabal.
Using --help after any cabal` command will open a help menu for that command.
Full documentation of Cabal may be found here.
Cabal Overview
The following components are used to build cabal projects:
package_name.cabal
This file is required, and should be in the root of the package directory.
The purpose of this file is to provide metadata on the package build.
Note that a project may contain several packages,
each with a separate package_name.cabal file.
There are two parts to this file, Package Properties and Component Types.
Package Properties contains information such as the package name and version.
The Component Types part contains information related to building and testing.
There are multiple sections in the Component Types part.
The required sections vary by project.
Some example sections are library, executable, and test-suite.
The library section is required in order for the package to be imported by an external GHC program. This section defines the build specifications for the package. There can only be one exported library defined per package, and that library is given the same name as the package name.
The visibility of a module is controlled by the library section.
Modules that are exposed to the package user are listed in exposed-modules.
exposed-modules is only required for library packages.
Modules that are used internally,
but not exposed to the package user are listed in the other-modules section.
main-is defines the Main module, and is only required for executable packages.
Every package module must be listed in one of these fields.
Other important library fields are listed below.
-
default-language: indicates the Haskell language version to use, which subsequently indicates the language extensions automatically loaded in the compiler. See Language Extensions for more details. -
default-extensionsindicates the language extensions to load for the package. See Language Extensions for more details. -
hs-source-dirs: lists the directories in which to search for Haskell modules. -
build-depends: lists the library dependencies required to build the package component. -
type: has different meanings depending on the library section. See the documentation for more details.
More detailed information on the package_name.cabal may be found here.
Setup.hs
When the build-type field in the package_name.cabal file is Custom,
Setup.hs is needed.
This file contains special instructions for setup tasks.
See The Package Field: build-type for more details.
TODO: What about the cabal.project file?
TODO: hie.yaml - is this specific to asclepias?
cabal update
To refresh the package index, use the cabal update command.
This will update all of the dependent packages,
pointing to the latest version.
Since we maintain dependent packages (e.g. interval_algebra and asclepias),
it is recommended to update prior to running cabal build.
cabal build
To build a project, use the cabal build command.
Without providing additional parameters,
this command will build all packages in the project.
To build a single package, use cabal build package_name.
You can amend cabal build to set the scope of the build.
The build can be limited to only certain modules.
It can also be limited to certain types of files.
Modules are defined within the package_name.cabal file. Use the following syntax to build a single module:
cabal build package_name:module_nameTo build all modules within a package of a specified type,
for example executables, use the following command:
cabal build package_name:typeCross-package builds are also possible. For example, to build all modules in a project of a specified type, use the following command:
cabal build all:typeNote that, by default,
Cabal doesn’t compile the test suite or benchmarking modules.
To include the test module, add the --enable-tests parameter to the command.
To include benchmarking, add the --enable-profiling parameter to the command.
For more details, see cabal-build in the Cabal documentation.
|
Building a project will initialize numerous compile processes. Both the project package(s) and all their dependencies will be build. The process can take serveral minutes, even when limiting the packages to build. |
cabal repl
Use the cabal repl command to launch the package in GHCi.
For more information on GHCi see the GHCi Usage section.
By default,
cabal repl loads the first component of the package in your current directory.
You can load a different component by using cabal repl component_name.
Further, you can load a different package by using cabal repl package_name.
Note that the package must be a sub-directory of your current directory.
You can also load a specific module by using cabal repl package_name:module_name
Other modifications to the cabal repl exist.
See cabal repl --help and cabal repl for full details.
Haskell Usage
This section outlines common components of the Haskell language and best practices for their usage.
Language Extensions
Haskell uses language extensions to expose extra features. These features are not part of the language definition, but add functionality deemed useful by the community. Extensions follow a normal development and testing cycle, and thus are considered "safe". Some extensions are even considered vital to the language. However, since they are not part of the language definition, they do require a bit more thoughfulness. See here for details.
There are many ways that a language extension is enabled. Language extensions may be enabled at different levels. They can apply to the entire project, a single package, or a single module.
To enable extensions within the scope of a single module, use a pragma. A pragma sends instructions to the compiler, and is not part of the code per se. The particular pragma for enabling language extensions is "LANGUAGE". See below for an example. The LANGUAGE pragma must be included at the top of the Haskell file. Comments may be included anywhere before, after or between pragma lines.
-- some comment
{-# LANGUAGE DeriveGeneric #-}
{-# LANGUAGE LambdaCase #-}
{-# LANGUAGE TupleSections #-}

-- module definition
module Sample.Criteria
  ( Criterion
  ) where

import           Data.Aeson
import           Data.Bifunctor                 ( Bifunctor(second) )
import           Data.List                      ( find )
import           GHC.TypeLits                   ( KnownSymbol
                                                , symbolVal
                                                )

yourCode::String
yourCode = "code"
To enable extensions on the project or package level, see Cabal Overview.
For more details language extensions, see the Extensions blog post by Veronika Romashkina.
Modules
A Haskell program consists of a collection of modules. Modules organize code and help to resolve namespacing issues.
|
Best Practice
Use the same name for the module and the file.
For example,
|
To declare a module in a Haskell file,
use module module_name with optional modifiers.
Module names are required to be a sequence of one or more strings.
The strings must begin with a capital letter
and must be separated by dots with no intervening spaces.
Features or Cohort.Core are some examples.
|
Best Practice
Use "." to specify the location of the module in the file structure.
For example,
a module named |
Exported entities are defined in the module statement.
Data and type entities, class and instance entities, type signatures,
and function definitions are examples of exports.
The (..) syntax indicates multiple entity components exist
and all of those components should be exported.
For example,
consider the statement data Status = Include | Exclude within a given module.
Including Status(..) in the export statement exposes the Status data type and its constructors, Include and Exclude, to any user of the module.
Including Status in the export statement would export only the data type but not its constructors.
In the latter case, you would call Status an "abstract data type".
Documentation on abstract data types may be found at the end of this section.
Using the module keyword in the export statement indicates that the entity is a module,
that the module-entity was part of the import statement,
and that the module-entity is being re-exported by the current module.
The import keyword in the module statement lists the entities to import.
Imports can be adjusted using keywords that modify what
and how an entity is imported.
For example, an import statement may contain the keyword qualified. This keyword modifies the process for adding components of the entity to the namespace. By default, all imported entities are non-qualified, which means the names of the entity components appear verbatim in the namespace. A qualified import would not appear verbatim in the namespace. Instead the entity name would be appended to the component name with a "." separator.
Instead of using the entity name,
you can specify a new, shorter name to append by using the as syntax.
Not all components of an entity need be imported.
To specify the components to import,
you can either provide a list of components to include
or, using the hiding keyword, a list of components to exclude.
Example
-- Module header
module ExampleCohort1
-- Export declarations
  ( Status(..)
  , makeBaselineFromIndex
  , module Cohort.Attrition
  ) where

-- Import declarations
import Cohort.Attrition
import Hasklepias
import qualified ExampleEvents
import qualified Data.ByteString.Lazy          as B
import qualified Data.Map.Strict               as M
                                                ( fromListWith
                                                , toList
                                                )
import ExampleEvents hiding (exampleSubject1, exampleSubject2)

-- Top level declarations
yourCode :: String
yourCode = "here"

-- Examples of qualification
runCollectionApp :: [Location] -> IO B.ByteString

collectBySubject :: [(SubjectID, d)] -> [(SubjectID, [d])]
collectBySubject x = M.toList $ M.fromListWith (++) (fmap (fmap pure) x)
For a complete description of Haskell modules, see the following documentation:
Haskell Language Server (HLS)
The Haskell language server (HLS) implements the Language Server Protocol(LSP). HSL can be very useful for development. It provides immediate feedback from the compiler, and has many other useful features.
To configure your editor to use HLS, please reference the documentation here.
If HLS ever stops working, you may need to clear the cache:
rm -rf ~/.cache/hie-bios/dist-asclepias*Linting & Formatting
Linting and formatting are required for CI pipelines to pass.
Currently, the hlint
and brittany tools are used, respectively.
You can install these locally using`cabal`:
cabal install brittany
cabal install hlint
Each project should have a lint.sh and format.sh file that will lint and format all files in a project. If these files do not exist, you can create them by copying the lint.sh and format.sh files.
The ShellCheck application is required to run the lint.sh script. To install, use the following command:
cabal install ShellCheckAfter ShellCheck and hlint installed, the lint check may be run locally using the following command:
bash lint.shor
./lint.shAfter brittany is installed, the format check may be run locally using the following command:
bash format.shor
./format.shNote that both these commands assume you are located in the folder containing the scripts.
GHCi Usage
The GHC compiler provides an interactive environment called GHCi.
You can access GHCi by typing ghci in the terminal.
Once in the GHCi environment,
Haskell code written in the GHCi can be compiled and executed by pressing enter.
The GHCi cannot by default support multi-line code.
So, the syntax in GHCi is slightly different from a .hs file.
See below for an example.
-- works in .hs file only
thisCode::String
thisCode = "hello"

-- works in .hs file or GHCi
thisCode::String; thisCode = "hello"
thisCode::String; thisCode = "hello"; thatCode::String; thatCode = "goodbye"

-- works in GHCi only
-- (press enter between each line)
{:
thisCode::String
thisCode = "hello"
:}
The GHCi can also be invoked in a cabal project by running cabal repl
with the desired parameters.
Once in GHCi, there are many commands that may be helpful.
A few common commands are covered below.
To see all commands, type :help,
or go to the documentation site listed at the end of this section.
To see all loaded modules, type :show modules.
When a module from a project is loaded into the REPL,
all declarations in the module are exposed to GHCi.
A declaration can be a type definition, function, class, etc.
The type of these declarations may be seen using :t <NAME>.
If you’d like to make a change to your module,
update the .hs file, then type :reload in the REPL.
To change to a different module within the same project,
use :load. This is show in the example below.
cabal repl hasklepias-examples:CohortExamples:show modules
:load FeatureExamples
:show modules
:load CohortExamples FeatureExamples
:show modulesMultiple modules may be loaded into the REPL concurrently.
import module_name and :module + module_name will accomplish this.
To remove a module, use :module - module_name.
When you load a module using the syntax above, all of the exports in scope.
To load the top-level bindings in addition to the exports,
use the *-form: :module + *module_name.
:show imports lists the modules in the current scope.
:show bindings lists any bindings in the current scope.
:browse lists all type declarations in the current scope.
See here for the full GHCi documentation.
Haddock Documentation
Haddock is a tool for building package documentation in Haskell. This documentation is required for uploading content to the hackage site. Haddock is automatically provided via the ghcup installation. No extra steps are required.
Package Setup
TODO
Haddock Syntax
A single line of haddock documentation begins with --|.
Multi-line haddock documentation begins with {-|
and ends with -}.
Basically, adding a pipe to a regular comment creates a haddock comment.
For details on what goes in the documentation, see the haddock documentation.
Adding Examples
Haddock documentation supports example code. The example code evaluates to produce a text result, which can be saved in the documentation comments. Doctests verify that the result of evaluating the code produces the value in the comment.
Examples must be nested inside the haddock documentation.
Code lines should begin with >>>,
and a blank line should follow.
After evaluating the code, the blank line will be filled with the result.
The scope of the embedded example code matches the scope of the Haskell file. In some cases, an example may require a modified scope. Language extensions may be set and packages imported in the example code. However, these lines will appear in the haddock documentation as part of the example. If this is undesireable, such setup instructions may be moved outside of the published documentation. To do this, create a setup section in your Haskell file as below:
-- $setup
-- >>> :set -XTypeApplications -XFlexibleContents -XOverloadedStrings
-- >>> import Prettyprinter
For more details on examples, see this blog post.
Publishing to Hackage
TODO how do you launch haddock documentation to hackage?
Testing
Code Coverage
Haskell’s code coverage tool is hpc.
To enable coverage reporting,
run cabal build with the --enable-coverage flag.
The "top-level" coverage can be reported in a CI pipeline’s info. "Test coverage parsing" in the repo’s Settings > CI/CD must be set to:
\d+\% top-level`See here for more details.
|
It’s not clear how to convert |
Git Usage Guide
We essentially follow the GitHub Flow branching strategy. See also trunk-based development for background.
In short:
-
a single, main branch, at present named
master, always provides a buildable, usable version of the software passing all checks. -
changes should be made on a separate branch split from
masterand merged back intomaster. -
short-lived branches proposing small changes are preferred to long-lived branches
-
careful staging and communication is encouraged for work that must be broad-reaching or highly interdependent.
-
versions are marked with tagged commits on
master.
We collaborate on Git projects through https://gitlab.com/TargetRWE/.
Branching and merging
Branching guidelines are
-
All proposed changes should be made in a branch separate from
master, sometimes called feature branches. -
Feature branches should originate from
master. -
Branches should strive to be short-lived and propose small changes, if possible.
-
In cases where a large number of changes must be made in one branch (e.g. for code correctness), extra coordination among team members would be a good idea to avoid painful conflicts.
-
Merges back to
masterare handled via merge requests (MRs) on GitLab. -
MRs are reviewed and merged in quickly, in the ideal.
-
Branch commits are squashed on merge.[1]
Example
In this example, you
-
Fetch updates from the remote.
-
Create a new local branch, e.g.
new-do, from the HEAD commit oforigin/master. -
Check out
new-doand add some commits. -
Push the local branch to the remote,
origin/new-do.
git fetch
git switch -c new-do origin/master
git push -u origin new-do
Note: The git switch statement above will automatically set new-do to track origin/master. You do not want that. The subsequent line corrects that by creating origin/new-do and setting the local new-do to track it.
Best practices for feature branches
Note: These are subject to change as we learn what works best for us.
-
Only one developer commits to a feature branch.
-
Always branch from an up-to-date
origin/master. -
If you must update your feature for relevant changes, take them from
origin/masternot other feature branches. -
Strive for "short-lived" branches with smallish changes where possible:
-
"Short-lived" means a branch that has existed for a week or less, though clearly that is more of a guideline than a strict standard. "Long-lived" therefore means a branch created more than a week ago. The window here is somewhat arbitrary based on our recent pace of development. Some recommend striving to keep feature branches for only a day’s work.
-
If your feature branch lags behind
origin/masterby more than a couple of commits, particularly version-tagged or relevant commits, consider splitting up the work into multiple branches so that your work-to-date can be merged more quickly intoorigin/master. "Relevant" means work that might conflict with yours. -
If your branch is more than a couple of days old because you are stuck, reach out for help on Slack, in a meeting, or on GitLab in the appropriate MR.
-
Communicate with others whose branches have inter-related work.
-
Consider adding a sequencing order to the associated version milestone description, if both features are to be part of the same version’s work. See Managing versions.
-
Reference dependent MRs or issues in your MR’s description.
Collaboration in more complex work
Some extra care is needed when your feature branch includes changes highly dependent or disruptive on others' work. That is more likely to occur in long-running branches.
Some tips for how to handle those situations:
-
Break up the work into smaller MRs, with one feature branch for each. If the disruptive component can be isolated, it will be easier to complete quickly and to resolve merge conflicts if needed.
-
If your work is part of a version-release milestone, which it likely will be, write up a workflow plan for whose work should be merged before the other. See Milestones.
-
For changes that are likely to be highly disruptive to other people’s work, such as a large filesystem reorganization, you could suggest all other work stop until your changes are merged.
-
In some cases, it might be reasonable for one person to work on a group of interelated changes, meaning that person is assigned to all of the related issues and corresponding feature-branch MRs.
Conflicts in merge requests
The branching flow above should reduce the chances of merge conflicts, or at least reduce their complexity, by
-
relying on
origin/masteras the common branch point and source of up-to-date code, -
creating short-lived and focused feature branches, and
-
merging in MRs quickly.
Together these produce a fairly linear Git history that is easier for Git and GitLab to merge without conflict.
Conflicts can be reduced further by
-
communicating with colleagues when doing inter-dependent work on feature branches, e.g. staging sequences of feature branches with dependent changes as part of a release milestone,
-
taking extra care to ensure changes that necessarily are broad-reaching, such as filesystem reorganizations, are done in isolation and with the knowledge that doing so will produce nasty conflicts for any unmerged feature branches.
Best practices for resolving merge conflicts
Conflicts do happen, and here are some best practices for managing them in a way that should work reasonably well with GitHub Flow:
-
git rebase origin/masteron your local feature branch should be the cleanest way to update your work. -
git fetchbefore you rebase.
Software versions
Versions are marked as specific states of the origin/master branch, using annotated tagged commits. These typically are tracked in milestones on GitLab and the version tag added to origin/master once all work is complete.
Versioning guidelines are
-
Use annotated tags in Git using the
-aflag, as ingit tag -a v1.[2] -
Tag labels should be of the form
v*, and the associated tag message need not have any particular content.
Managing versions
Since versions are simply snapshots of origin/master at a given commit, we need a process to decide who adds the version tag and when.
Note: To manage versions you will either need to have a local master tracking origin/master or will need to add tags through the GitLab user interface.
The workflow for managing versions is as follows:
-
Create a GitLab milestone for
vX, versionXof a given repo’s software. -
Associate MRs and their respective feature branches with the milestone.
-
Once all feature branches are merged for a given milestone, create a
bump-vXbranch to increase the version number. Changes required there will differ by project. -
After
bump-vXhas been merged intoorigin/master, add a tag pointing to the resulting commit. In other words, thebump-vXmerge commit marks the state oforigin/mastergiving versionvX.
Note that you can add a tag to any past commit, so if we forget to add a version tag immediately after the milestone is complete we can add it later. See Creating tags.
Milestones
We track work on the next version of our software with GitLab milestones.
-
Milestones should be named for the version.
-
A version tag, say for version "vX", should be assigned as soon as the
bump-vXbranch of a given milestone is merged intoorigin/master. -
MRs and issues that are not to be completed as part of this version should be removed from the milestone.
-
It might be helpful to assign a person in the milestone description to make the final
bump-vXbranch merge and subsequent tag associated with a milestone and version. -
In versions with inter-dependent feature branches, it might make sense to suggest a work flow in the milestone description for the affected branches, e.g.
FeatB → FeatC → FeatF.
Creating tags
All version tags must be annotated tags with name of the form vX, where X is the version number. They need not have any particular tag message.
You can create annotated tags locally then push them to GitLab like so
git tag -a "vX" <commit>
git push --tags
Leaving <commit> blank tags the current branch HEAD. git push --tags pushes only tags, not commits. You can push tags to protected branches on GitLab, unlike for commits.[3]
Additional tips and comments:
-
git tag --listor view tags in the project’s Repository menu in GitLab. -
Tag names must be unique among tags. Branches and tags can share names, but beware: Both serve as references to a commit, and doing so will create an ambiguous reference.
-
You can add multiple annotated tags to a single commit.
Creating tags with GitLab
Create them through the GitLab web UI for a project at Repository → Tags → New tag.
-
If you do not wish to tag the HEAD commit of a branch, you can copy-paste a commit hash. The UI here is awkward though.
-
You must include a tag message to create an annotated commit.
Deleting and modifying tags
To delete a tag named "vX" from your local branch, then delete it from the remote, do
git tag -d vX
git push origin --delete vX
The simplest way to rename / replace a tag is to delete it and add it again with the new tag name.
You can add multiple tags to the same commit, as well. To add a second tag called versionX referencing the same commit as vX, do [4]
git tag -a versionX vX^{}Projects referencing our software
If software is published to an external package registry, downstream projects should prefer to get the software from there. interval-algebra, for example, is hosted on https://hackage.haskell.org, and the version of that package used would be handled by the cabal package manager.
Sometimes, projects using the software will need to reference a Git repository rather than some other source.
In that case, projects should reference a particular version-tagged commit of the repository. Doing so avoids instability that comes with always pulling in unwanted changes from the HEAD commit, which might include merge commits from feature branches for the next version in progress.
Hot fixes
Conceptually, a hot fix is a change to software already in use that must be pushed immediately, e.g. a critical bug fix.
In some workflows, feature branches do not target master but instead target version branches or a development branch. There, a hotfix branch would directly target master and is intended to address some problem in production immediately.
In this workflow, hot fixes are simply branches targeted for merge into master that retroactively are included in the previous version (as defined by a tagged commit) and are not part of a version milestone. Unlike feature branches, which are incorporated via MR, hot fixes must be incorporated into master in a particular way.
Note on public software
This procedure is not appropriate for software published to hackage or any other public package registry, e.g. crates.io. Downstream projects using such software should already be using the versions provided by the registry, and any bug fixes would be incorporated in some versioned release in the usual manner.
This procedure only applies to software, such as asclepias, for which some internal GitLab-hosted repository is the source.
Procedure for incorporating hot fixes
In this workflow, hot fixes require special care because commits from a version in progress might already have been merged into master. Projects using our software via Git repository must reference a particular version-tagged commit, to avoid such unwanted changes prior to the next version-tagged commit.[5]
Therefore, a hot fix is implemented by rewriting the history of master to insert the change directly after the version-tagged commit it modifies. You must then and update the version tag to point to the commit in which the hot fix is included. Those changes are made locally, and the history of origin/master must be updated with a forced push.
Note only maintainers will be allowed to force push to a protected origin/master on GitLab, and force pushes must be allowed in the repo settings.
The following commands implement this procedure for a hot fix to version "vX", as though the same person is both creating the hot fix and pushing it to GitLab. See Example of hot fix for clarity.
# Checkout version that needs fixing
git checkout vX
git switch -c hotfix-vX
git push -u origin hotfix-vX

# Make changes, commit them, share with remote etc. Note that you'll need to
# squash manually if you wish to do so, since we are not merging in the usual
# way.
<changes made to fix bug>

# Rebase master to hotfix-vX so that hotfix commits are made immediately after vX commit
git switch master
git pull
git rebase --rebase-merges hotfix-vX master

# Update the version tag. Note the new merge-base is the last commit from hotfix-vX now.
git tag -d vX
git tag -a vX $(git merge-base hotfix-vX master)

# Update the remote. You will need special privileges to force-push to protected master.
# The forced tag push is needed to overwrite the existing tag vX in the remote.
# Alternatively, you could delete the vX tag in the remote in the previous
# step. See the "Deleting and modifying tags" section.
git push --force
git push --force --tags
Example of hot fix
For clarity, the following is a more complete example of implementing a hot fix.
In this example, we suppose some project is targeting the v1.0 version of master. That version includes a bug that must be fixed immediately. master, though, already includes two commits (hashes efgh and ijkl) from features to be included in v1.1.
Two people will be involved: The first, "Brownan Brend," will make the change in branch hotfix-v1. The second is a privileged user, "Saulley Brad," who will update the version tag and the master branch in the remote.
The relevant history of origin/master before including the hot fix is
merge commit abcd (tag: v1.0) --> merge commit efgh --> merge commit ijkl (HEAD)
Note efgh and ijkl are merge commits, since they are incorporated into master via MRs. That will not be the case for the hot-fix-related commit.
When we’re done, the history will be
merge commit abcd --> commit mnop (tag: v1.0, hotfix-v1) --> merge commit efgh --> merge commit ijkl (HEAD)
-
Brownan Brend creates
hotfix-v1from thev1.0commit ofmaster, sharing it with the remote.
git switch master
git pull
git checkout "v1.0"
git switch -c hotfix-v1
git push -u origin hotfix-v1-
Brownan Brend fixes the bug in commit with hash
mnop, and pushes the changes to the remote.
< fix changes >
git commit -am "fixed bug xxxx"
git push
The relevant history for hotfix-v1 now is
merge commit abcd (tag: v1.0) --> commit mnop (HEAD)
-
Saulley Brad updates their local master to include the fix, via rebase.
git switch master
# Note this should implicitly fetch first, so you have the new origin/hotfix-v1
git pull
# git merge-base origin/hotfix-v1 master is the tagged commit v1.0
git rebase --rebase-merges origin/hotfix-v1 master
It is possible to have merge conflicts from work in commits efgh, ijkl related to v1.1 in progress. In cases where merge conflicts are expected, it might make sense for either Saulley or Brownan to do all of these tasks themselves, rather than splitting the load.
The history for master in Saulley’s local repo now looks like this,
merge commit abcd (tag: v1.0) --> commit mnop (hotfix-v1) --> merge commit efgh --> merge commit ijkl (HEAD)
-
Saulley Brad updates the version tag, then updates
masterin the remote
This step redefines v1.0 of the software to include the hot fix.
git tag -d "v1.0"
# merge-base now is commit mnop
git tag -a "v1.0" $(git merge-base hotfix-v1 master)

git push --force
git push --force --tags
The relevant history for origin/master is now
merge commit abcd --> commit mnop (tag: v1.0, hotfix-v1) --> merge commit efgh --> merge commit ijkl (HEAD)
Now, any project referring to commit with tag v1.0 will be using a version in which the fix is applied.
Development on v1.1 proceeds as normal, though any unmerged feature branches will need to rebase to origin/master to get the updated history.
Simple linear workflow
In this case, we have two feature branches that are sequenced one after another. Both are part of the v0.2 milestone. Once merged we branch bump-v0.2, make all version-bumping changes, and tag the merge commit of bump-v0.2 on origin/master.
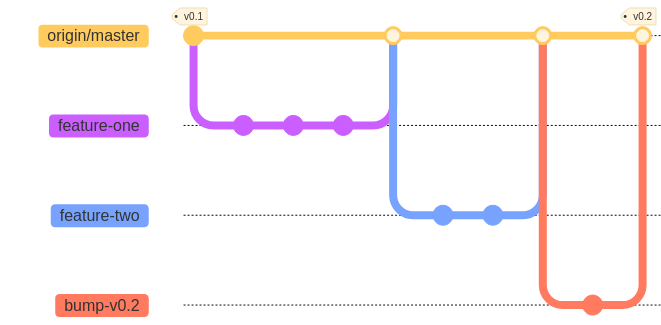
Overlapping branches
Here, we’ve complicated the workflow slightly by creating a long-running branch (feature-two), which originally was intended to be completed in milestone v0.2 but ends up being delayed to milestone v0.3.
Possible conflicts
Though it is not ideal to have longer-running branches, they often happen. If feature-two is not dependent on the other features, there likely will be no conflicts when the former attempts to merge.
If feature-two 's attempt to merge creates conflicts, the branch’s author should be able to resolve them with a rebase to origin/master, since the latter’s history is simple and linear. Otherwise, the author can use whatever methods they deem appropriate, e.g. merge origin/master into feature-two, cherry-pick certain commits, etc.
Note: Whatever commits there might be associated with updating feature-two for the work in v0.2 are not shown.
To avoid such difficulties, the author could delay branching feature-two until feature-three is merged, or otherwise could better coordinate their work with the author of feature-three.
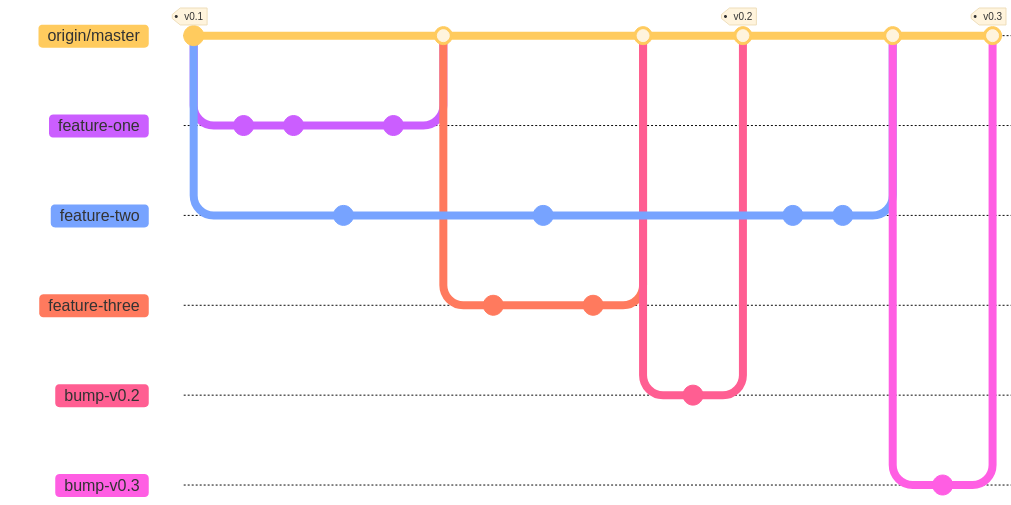
Managing versions
The use of bump-vX branches helps to organize which commits are marked for a given version. Features to be included in a given version are managed using the GitLab milestones feature. The version tag must manually be added to the merge commit for bump-vX. See Creating tags.
In the pictured example,
-
Initially,
feature-one,feature-twoandfeature-threeare all part of thev0.2milestone. -
feature-twowasn’t ready or perhaps was dependent onfeature-three, say, and was delayed tov0.3. -
feature-oneandfeature-threewere included in the milestone associated withv0.2. -
feature-twois the sole feature branch included inv0.3.
Tags can be added retroactively, should we forget to do so before beginning work on v0.4, and they can be deleted and remade altogether in case of error.
Note the author of feature-two could consider simply ditching the branch, re-branching and re-doing the work if the changes from v0.2 would make updating the history difficult.
What you do not see here
The workflow above is still perfectly consistent with these guidelines. With that in mind, it’s worth noting what the diagram does not show:
-
There are no direct commits on
origin/masteroutside of feature branches. All commits onorigin/mastershould be via merge requests on GitLab from feature branches. -
All feature branches originate from
origin/masterand not other feature branches.
Tips & Tricks
Tags
You can checkout a tag like you would a branch. This creates a detached head, from which you can make commits or branch. With version tags, you can therefore access the state of master for a particular version and create a branch directly from that state.
Here’s an example of using a version tag to create an example branch v1-example from version v1 of master.
git checkout v1
git switch -c v1-example
# do some work now
git add .
git commit -m "added an example about v1"
Finding common ancestors
git merge-base <commit refs> displays the commit that is the common ancestor of all <commit refs>. For example, you can find the commit at which feature-branch-one was branched from master using git merge-base master feature-branch-one.
Visualizing branch structure
GitLab has some tools for visualizing branch structure, but the commandline tool has more flexibility and features.
To create a graph of the history for <commit refs> commit references in tree-like order, with some nice annotations, you can do
git log <commit refs> --graph --pretty --topo-order --decorateBranch names in <commit refs> will default to the HEAD commit as usual. References can include tags or any other Git commit reference syntax.
Git allows you to alias more complex commands by adding them to your ~/.gitconfigure file. That is helpful in particular with git log commands that use the more advanced formatting features. Adding the following example text to your ~/.gitconfigure file creates several aliases for git log commands with the given specifications. These commands would be invoked with git lg, git lg1 etc.
[alias]
    lg = !"git lg1"
    lg1 = !"git lg1-specific --all"
    lg2 = !"git lg2-specific --all"
    lg3 = !"git lg3-specific --all"
    lg1-specific = log --graph --abbrev-commit --decorate --format=format:'%C(bold blue)%h%C(reset) - %C(bold green)(%ar)%C(reset) %C(white)%s%C(reset) %C(dim white)- %an%C(reset)%C(auto)%d%C(reset)'
    lg2-specific = log --graph --abbrev-commit --decorate --format=format:'%C(bold blue)%h%C(reset) - %C(bold cyan)%aD%C(reset) %C(bold green)(%ar)%C(reset)%C(auto)%d%C(reset)%n''          %C(white)%s%C(reset) %C(dim white)- %an%C(reset)'
    lg3-specific = log --graph --abbrev-commit --decorate --format=format:'%C(bold blue)%h%C(reset) - %C(bold cyan)%aD%C(reset) %C(bold green)(%ar)%C(reset) %C(bold cyan)(committed: %cD)%C(reset) %C(auto)%d%C(reset)%n''          %C(white)%s%C(reset)%n''          %C(dim white)- %an <%ae> %C(reset) %C(dim white)(committer: %cn <%ce>)%C(reset)'
        change-commits = "!f() { VAR=$1; OLD=$2; NEW=$3; shift 3; git filter-branch --env-filter \"if [[ \\\"$`echo $VAR`\\\" = '$OLD' ]]; then export $VAR='$NEW'; fi\" $@; }; f"
Running GitLab jobs locally
The gitlab-runner application can be used to run jobs locally.
Use the exec command.
gitlab-runner exec can (currently) only run one job at a time.
|
See here for instructions on installing gitlab-runner on your machine.
|
Here is an example of using the shell executor to run the check-source job in asclepias.
% gitlab-runner exec shell check-source
Runtime platform                                    arch=amd64 os=darwin pid=21602 revision=f0a95a76 version=14.5.0
WARNING: You most probably have uncommitted changes.
WARNING: These changes will not be tested.
Running with gitlab-runner 14.5.0 (f0a95a76)
Preparing the "shell" executor
Using Shell executor...
executor not supported                              job=1 project=0 referee=metrics
Preparing environment
Running on TGTRWE-LT-0081...
Getting source from Git repository
Fetching changes...
Initialized empty Git repository in /Users/bsaul/Documents/novisci/software/asclepias/builds/0/project-0/.git/
Created fresh repository.
Checking out 775b60a6 as 146-docs...
Skipping Git submodules setup
Executing "step_script" stage of the job script
$ ./scripts/lint.sh
No hints
$ ./ci/ci-check-format.sh
Job succeeded
Metrics tracking workflow
We hope to generate a few metrics to track:
-
How well we are following the workflow described above.
-
To what extent we have avoided "problematic" merges and other Git-related problems.
Exactly how best to do so is not clear and is subject to ongoing debate. This section will include a description of such metrics and means to generate them once we have settled on some.
^{} reference syntax is to ensure the tag references the commit and not the tag itself. From git help revisions "A suffix ^ followed by an empty brace pair means the object could be a tag, and dereference the tag recursively until a non-tag object is found."
development branch in the workflow.